
Configuring App Identities
The Chat API lets you send and receive Blink chat messages from outside the app - for example, to post shift alerts, run an onboarding chatbot, or reply to employees automatically. Everything lands in the same Blink inbox people already use. To use the Chat API, you need an App Identity.
Setting up an App Identity
An App Identity is the "account" your integration uses to talk to Blink. Creating one gives you a Client ID and Client Secret. Navigate to Blink Admin portal and click Create app. Choose App Identity option.
Fill in the details:
- Name: what the app is called (e.g. "Shift assistant").
- Tagline: a short description.
- Logo: an image for the app.
- Webhook URL: the web address where Blink will notify you when something happens (a new message is posted, or someone joins or leaves a chat). You can add this later if you don't have one yet.
- Events: these are webhook events that you can subscribe to:
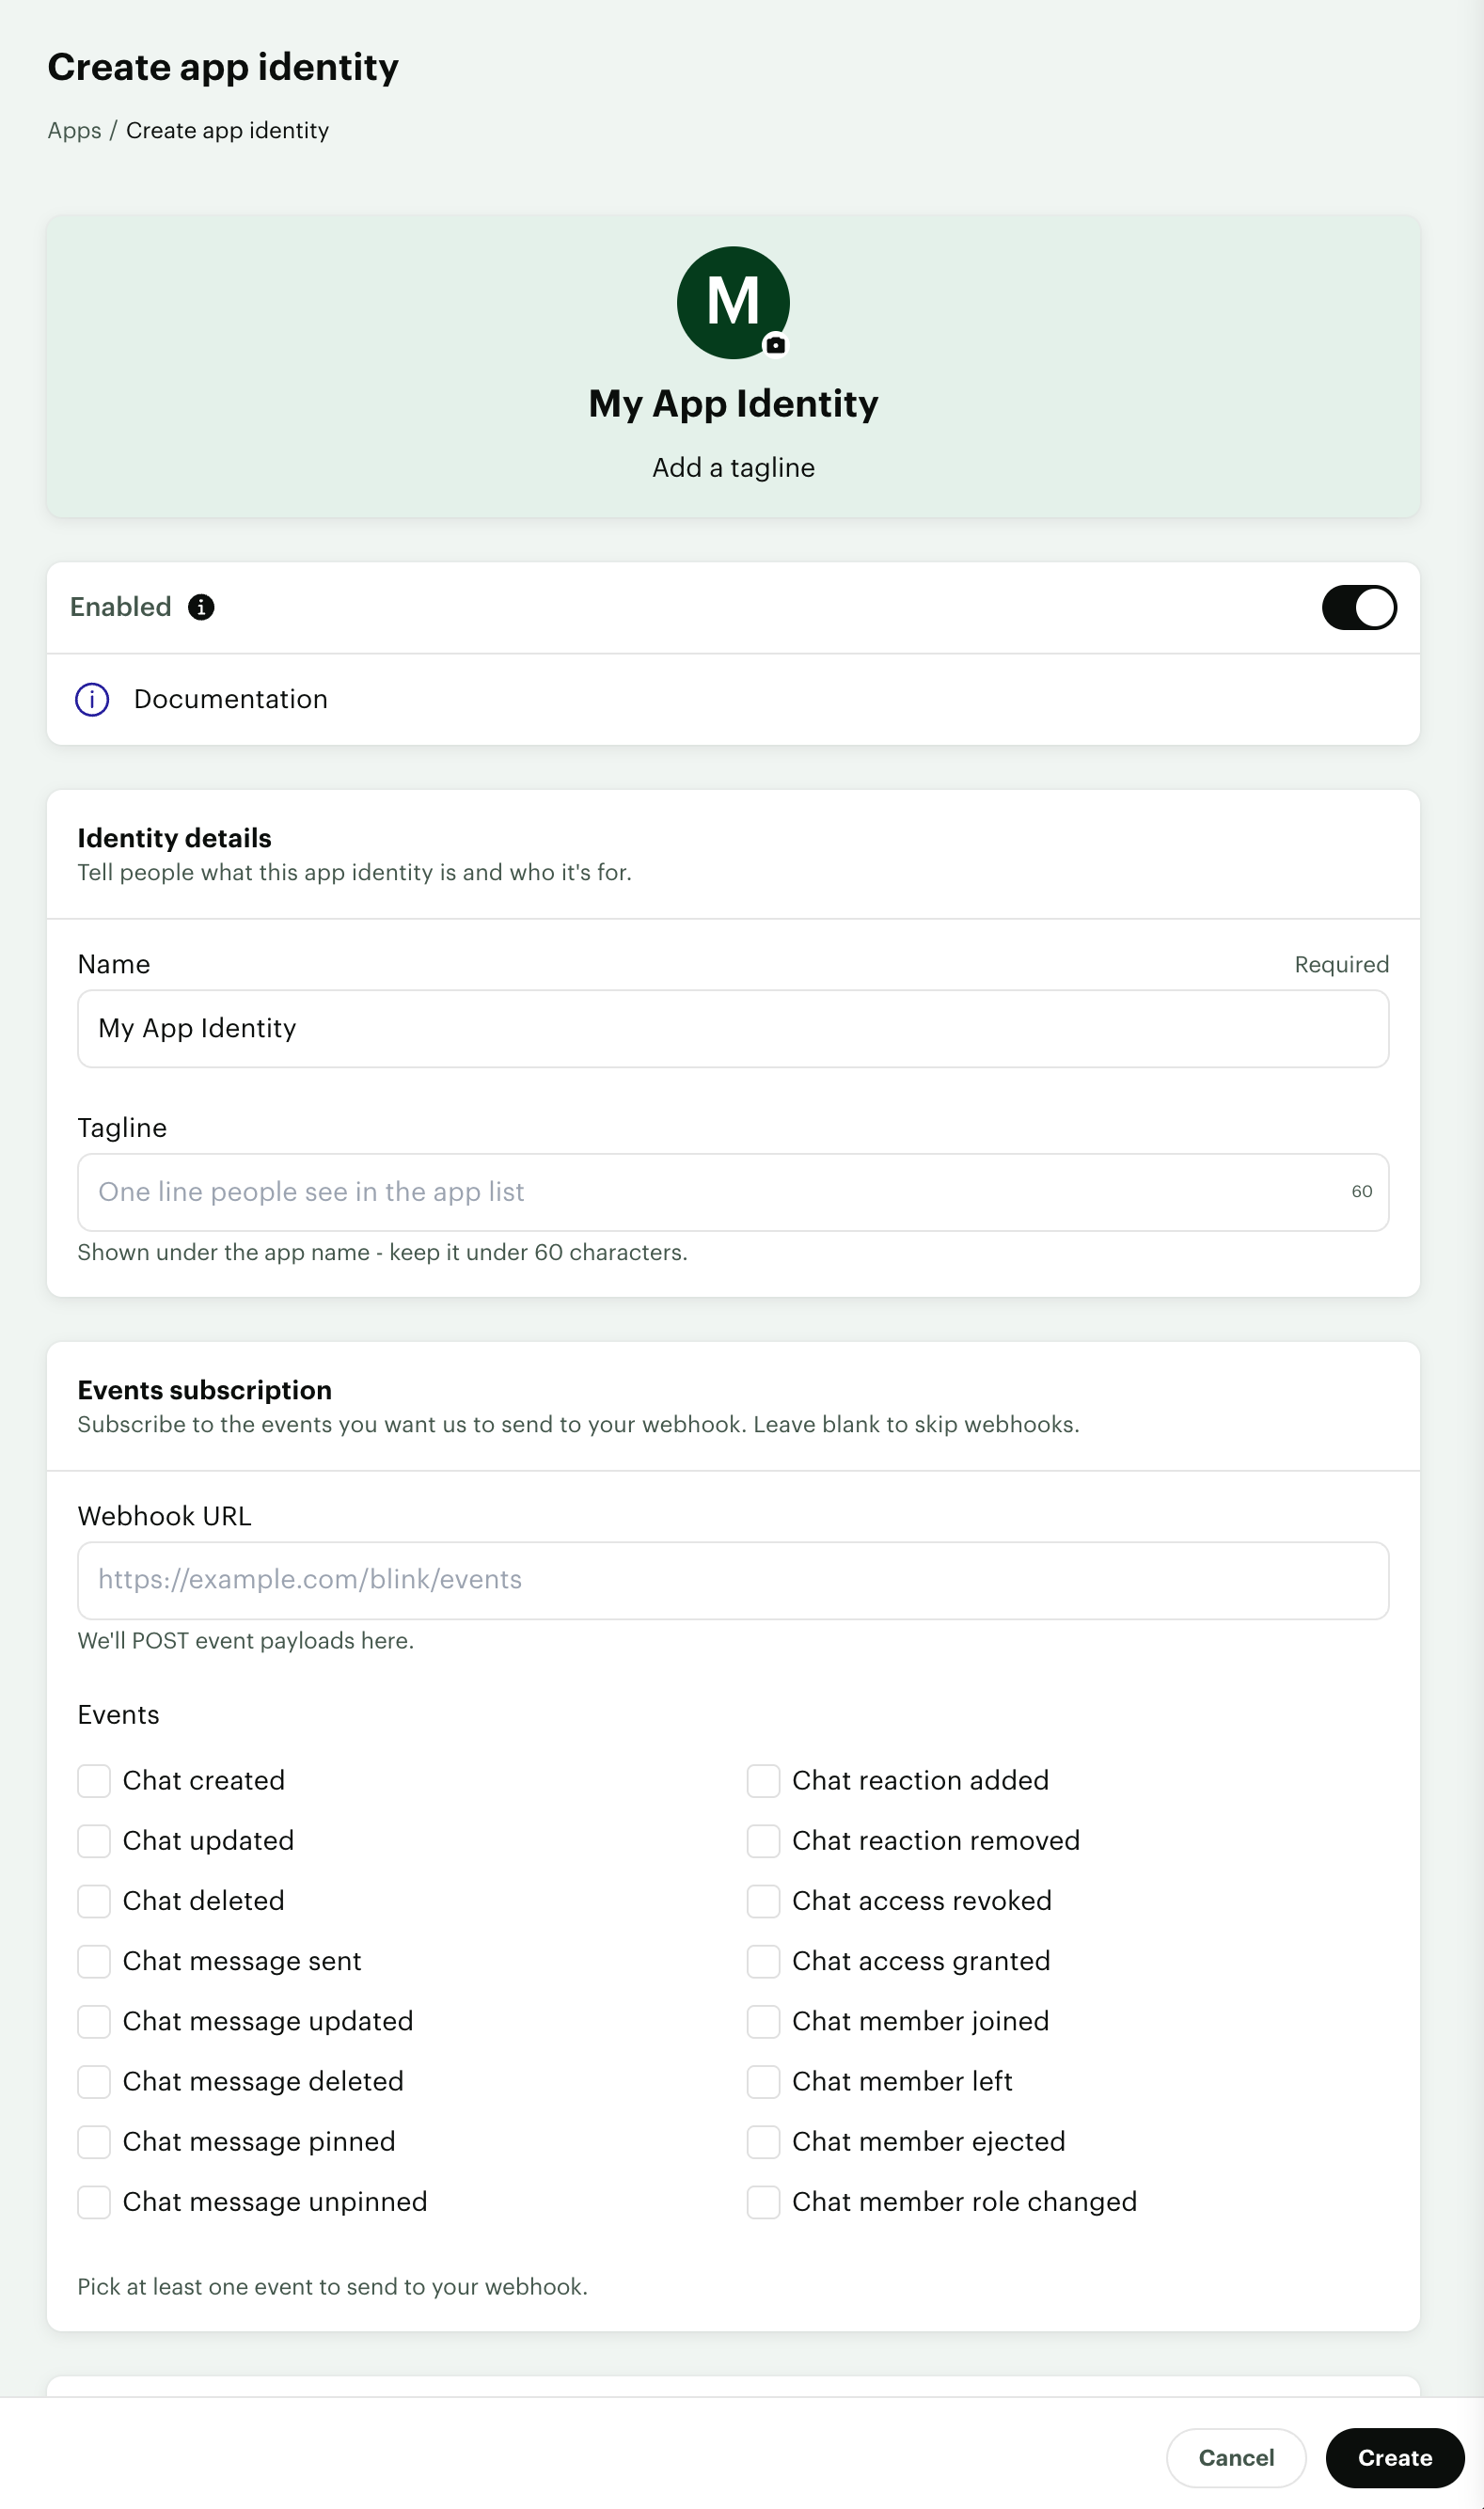
Once your App Identity is configured, click Create - this will generate a Client ID and Client Secret which you will need to make authenticated API calls. The Client ID is also your App Identity ID used to manage the apps membership in Blink chat and sending messages.
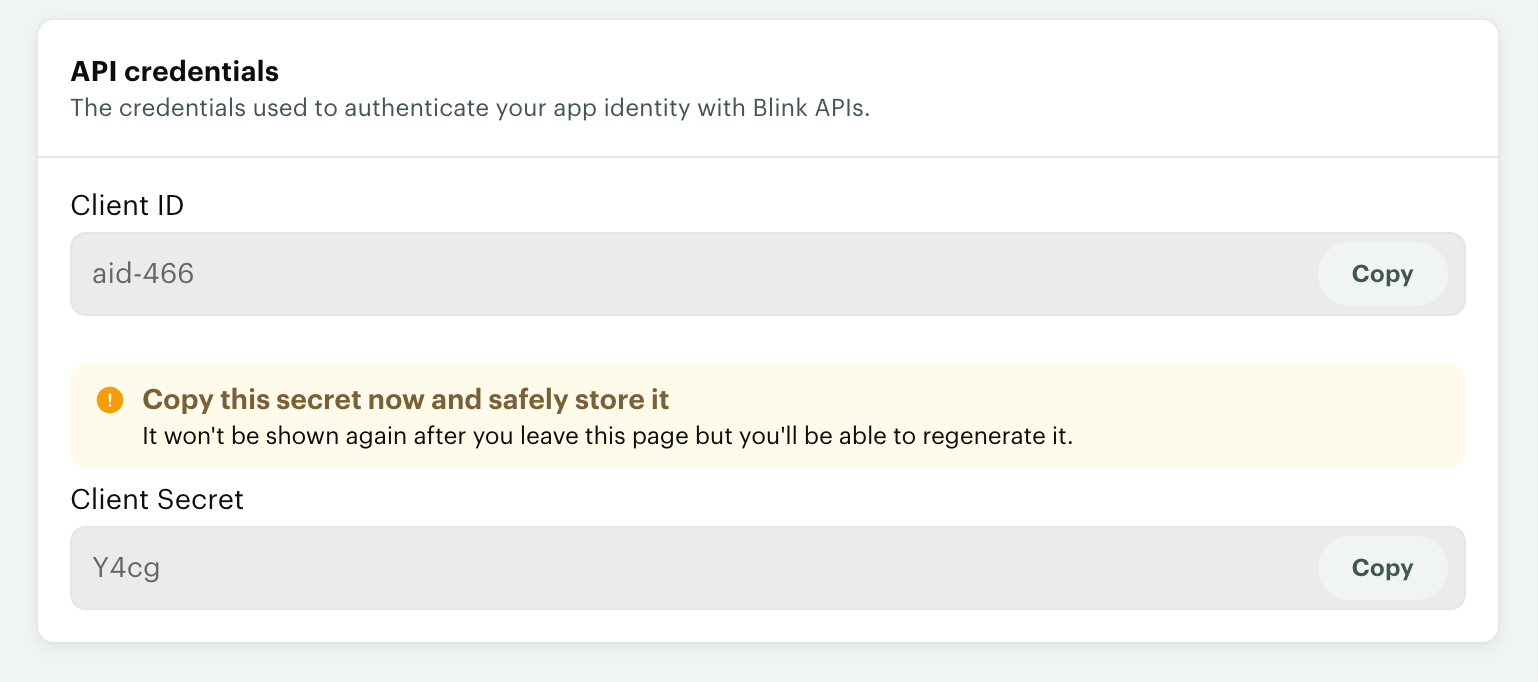
Authentication
Before you can send or read messages, you need an access token. This is a short-lived token that is required to authenticate your API requests. You get one by sending your Client ID and Client Secret to Blink's token endpoint.
curl --location --request POST 'https://api.joinblink.com/oidc/token' \
--header 'Content-Type: application/x-www-form-urlencoded' \
--data-urlencode 'grant_type=client_credentials' \
--data-urlencode 'client_id={client-id}' \
--data-urlencode 'client_secret={client-secret}'
This will return a response like so:
{
    "access_token": "ey...",
    "expires_in": 300,
    "refresh_expires_in": 0,
    "token_type": "Bearer",
    "not-before-policy": 0,
    "scope": ""
}
The value of access_token is what you'll use in every request below as a bearer token. Provide it in the Authorization header of your Chat API requests.
Note: Tokens expire (the
expires_invalue is the number of seconds it lasts - 300 seconds is 5 minutes). When a token runs out, just request a new one the same way.
Creating a chat
Now create a chat to send messages into. At a minimum you give it a type and a title. You can also add a description and the people who should be in it.
curl --location --request POST 'https://api.joinblink.com/api/platform/chats' \
--header 'Content-Type: application/json' \
--header 'Accept: application/json' \
--header 'Authorization: Bearer {access_token}' \
--data-raw '{
  "access_rule": {
    "@type": "private"
  },
  "members": [
        {
            "@type": "app",
            "app_identity_id": "{client-id}"
        },
        {
            "@type": "user",
            "user_id": "USER-ID"
        }
  ],
  "organisation_id": "{organisation-id}",
  "title": "Shift, 10-14 Aug",
  "description": "Conversation linked to our shifts"
}'
A quick look at what's inside the request:
- members: who's in the chat. List your app (so it can post) and the people you want to include. Each
user_idis the ID of a Blink user and starts withu-*. Theapp_identity_idis the same as the Client ID of the App Identity and starts withaid-* - organisation_id: the Blink organisation the chat belongs to. This can be retrieved from the JWT token body generated in the previous step.
- title: the chat name people will see.
- description: an optional note about what the chat is for.
To add more people to an existing chat, send their user IDs.
Sending messages
Once the chat exists, you can post messages to it. Use the chat's ID in the API endpoint, and put the message text in the request.
curl --location --request POST 'https://api.joinblink.com/api/platform/chats/{chat-id}/messages' \
--header 'Content-Type: application/json' \
--header 'Accept: application/json' \
--header 'Authorization: Bearer {access_token}' \
--data-raw '{
  "sender": {
    "@type": "app",
    "app_identity_id": "{client-id}"
  },
  "body": {
    "@type": "markdown",
    "markdown": "**Heads up:** we have limited staff for today"
  },
  "unfurl_links": true
}'
What the fields mean:
- sender: who the message is from (your app).
- body: the message itself. Using
"@type": "markdown"lets you add basic formatting like bold text. - unfurl_links: set to
trueto show a link preview when your message contains a URL.
Adding your app to an existing chat
Your app can also join chats that already exist in Blink. A chat admin adds it from inside the chat using the /addapp command and your App Identity ID.
-
Share your App Identity ID (starting
aid-) with the person who will add the app. You can find it in the Blink Admin portal, where it's shown as the app's Client ID. -
In Blink, open the chat and type in the message box:
/addapp aid-xxxxxxxx -
Once the command is sent, your app will be added to the chat as a member
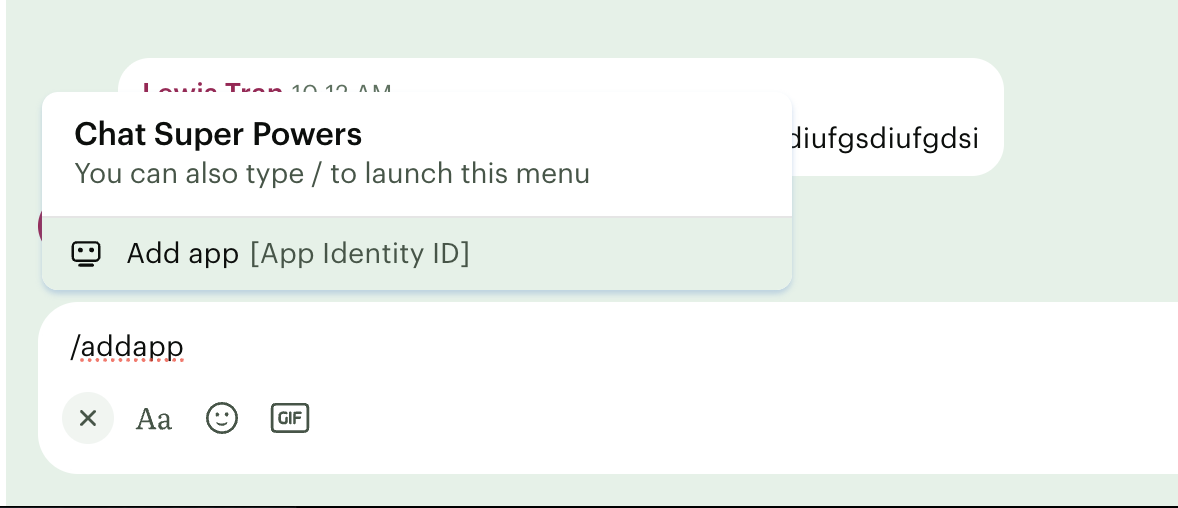
Once added, your app can send messages to the chat and will receive webhook notifications for activity in it, the same as any chat it created itself.
Note: We're working on an easier way to find and add apps by name.
Receiving messages
When someone posts a message in a chat your app is part of, Blink sends a notification to the Webhook URL you set when creating your App Identity. This is how your integration can react to what people say (for example, to power two-way conversations).
The notification looks like this:
{
    "id": "00000000-0000-0000-0000-000000000000",
    "organisation_id": "o-00000000-0000-0000-0000-000000000000",
    "occurred_at": "2026-09-04T08:43:53.794298Z",
    "detail": {
        "message_id": {
            "chat_id": "c-00000000-0000-0000-0000-000000000000",
            "local_message_id": "m-00000000-0000-0000-0000-000000000000"
        }
    },
    "@type": "chat.message-sent"
}
The notification doesn't include the full message, but instead points to which chat and message it was. Use those IDs to fetch the message details:
curl --location --request GET 'https://api.joinblink.com/api/platform/chats/{chat-id}/messages/{message-id}' \
--header 'Accept: application/json' \
--header 'Authorization: Bearer {access_token}'
Blink returns the message:
{
    "message_id": {
        "chat_id": "c-00000000-0000-0000-0000-000000000000",
        "local_message_id": "m-00000000-0000-0000-0000-000000000000"
    },
    "sender": {
        "@type": "user",
        "user_id": "u-00000000-0000-0000-0000-000000000000"
    },
    "created_at": "2026-09-04T09:01:51.697891Z",
    "files": [],
    "body": {
        "@type": "markdown",
        "markdown": "Hello!"
    },
    "reactions": []
}
Tip: For security, check that each notification really came from Blink before acting on it, by validating the webhook signature. See Webhook usage guide.
Webhook event reference
| Event name | Event type |
|---|---|
| Chat created | blink.chat.chat-created |
| Chat updated | blink.chat.chat-updated |
| Chat deleted | blink.chat.chat-deleted |
| Chat message sent | blink.chat.message-sent |
| Chat message updated | blink.chat.message-updated |
| Chat message deleted | blink.chat.message-deleted |
| Chat message pinned | blink.chat.message-pinned |
| Chat message unpinned | blink.chat.message-unpinned |
| Chat reaction added | blink.chat.reaction-recorded |
| Chat reaction removed | blink.chat.reaction-removed |
| Chat access revoked | blink.chat.access-revoked |
| Chat access granted | blink.chat.access-granted |
| Chat member joined | blink.chat.member-joined |
| Chat member left | blink.chat.member-left |
| Chat member ejected | blink.chat.member-ejected |
| Chat member role changed | blink.chat.member-role-changed |
Updated 1 day ago